Indulge in Festive Chocolate Peanut Butter Pumpkins This Halloween
As the leaves begin to turn and a crisp autumn breeze fills the air, there's an undeniable buzz of excitement for all things spooky and sweet. Halloween, a time for costumes, haunted houses, and, of course, delightful treats, offers the perfect excuse to get creative in the kitchen. And what could be more quintessentially Halloween, while also satisfying a universal craving, than a magnificent fusion of rich chocolate and creamy peanut butter? Enter the enchanting world of chocolate peanut butter pumpkins – a seasonal masterpiece that promises to be the star of your festive celebrations.
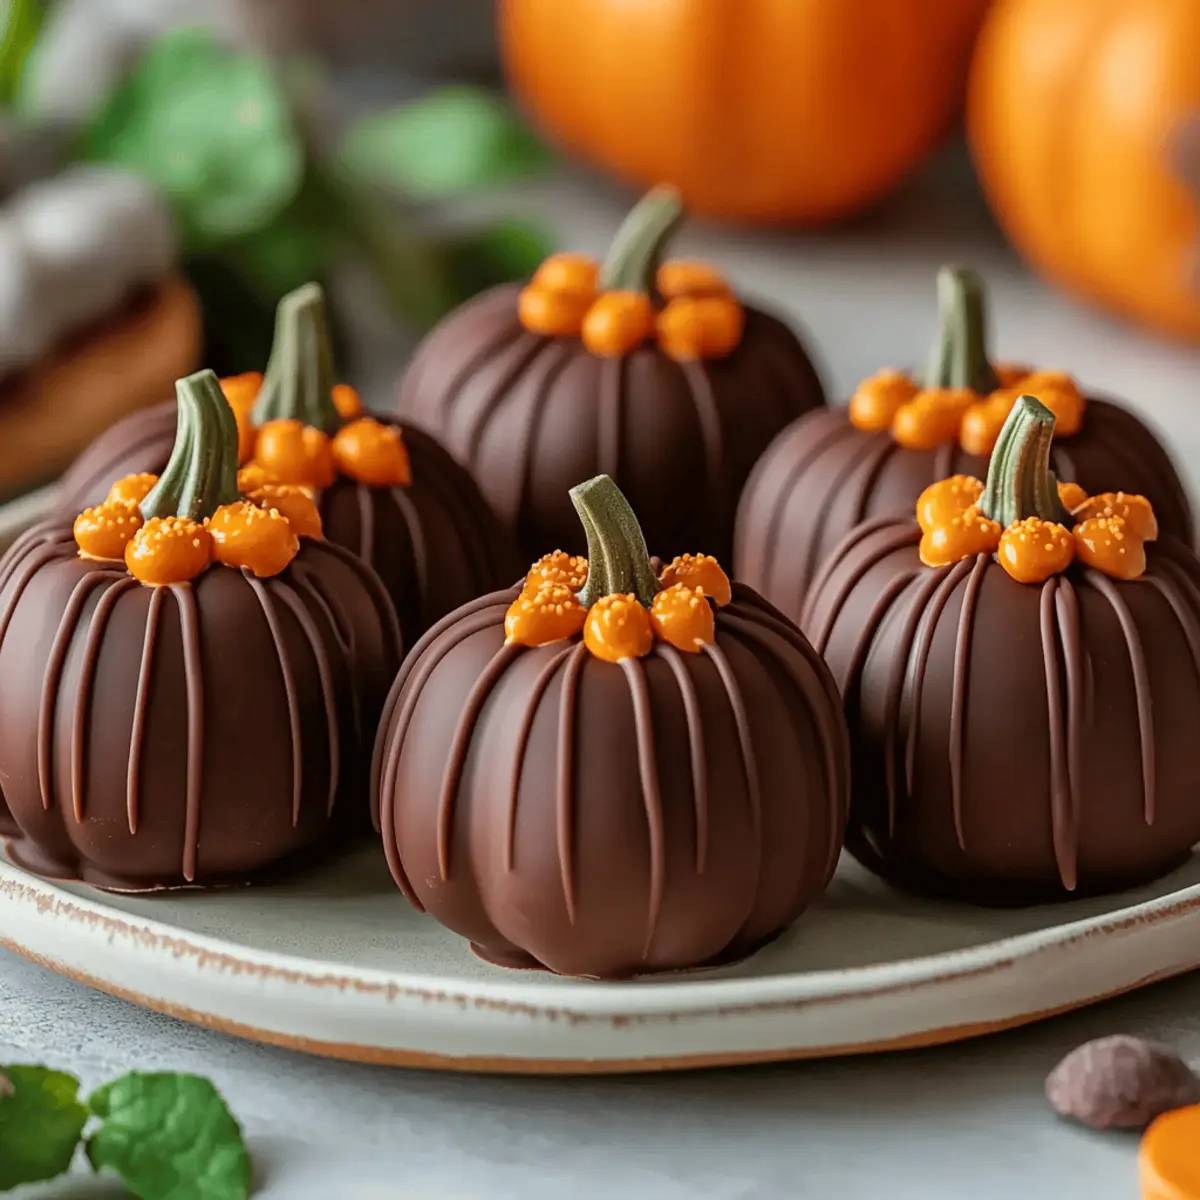
These charming, no-bake delights are more than just candy; they're an experience. Imagine sinking your teeth into a smooth, dark chocolate shell, giving way to an irresistibly creamy, slightly salty peanut butter filling. They capture the spirit of Halloween with their adorable pumpkin shape, making them a festive centerpiece on any dessert table, a welcome sight for trick-or-treaters, or simply a comforting snack for a cozy night in. Forget complicated baking – these chocolate peanut butter pumpkins are incredibly easy to whip up, transforming a few simple ingredients into a truly indulgent and easy no-bake chocolate peanut butter pumpkins for Halloween treat that everyone will adore.
Why Chocolate Peanut Butter Pumpkins are Your Halloween Must-Have
The allure of chocolate peanut butter pumpkins extends far beyond their delicious taste. They embody everything we love about Halloween treats: fun, festive, and incredibly satisfying. Here’s why these delightful bites should be at the top of your spooky season menu:
- A Fun Twist on a Classic: While the classic chocolate peanut butter cup holds a special place in our hearts, these pumpkin-shaped versions add a playful, seasonal dimension. They transform a beloved flavor combination into a holiday-specific confection that instantly puts everyone in the Halloween spirit.
- Effortless & No-Bake: One of the biggest advantages is the simplicity. There’s no oven required, making them perfect for amateur bakers, busy parents, or anyone looking for a quick yet impressive dessert. The "no-bake" aspect also makes them a fantastic kitchen activity for kids, allowing them to participate in shaping and decorating without the risks associated with hot ovens.
- Versatile for Any Occasion: Whether you're hosting a grand Halloween bash, preparing goodie bags for trick-or-treaters, or simply want a special treat for movie night at home, these pumpkins fit seamlessly into any scenario. They’re perfectly portioned and easy to handle, making them ideal for gatherings.
- Customizable for Every Palate: From dark chocolate devotees to those who prefer a sweeter filling, these pumpkins are wonderfully adaptable. You can adjust the type of chocolate, the sweetness of the filling, and even add extra flavors to make them uniquely yours.
- Impressive Presentation: Their distinctive pumpkin shape and rich chocolate coating make them look professionally made, even though they’re incredibly simple. They instantly elevate any dessert spread, making guests wonder about your culinary secrets!
These festive bites are truly a celebration of flavor and fun, promising all the creamy peanut butter goodness you love, wrapped in a smooth, inviting dark chocolate shell. It’s no wonder they’re often described as scarily good: dark chocolate peanut butter pumpkins recipe!
Crafting Your Perfect Pumpkin: Ingredients and Smart Swaps
The magic of these chocolate peanut butter pumpkins lies in their surprisingly simple ingredient list, making them accessible and easy to prepare. However, selecting the right components and understanding potential swaps can elevate your creations from good to gourmet. Let's break down the essentials:
The Peanut Butter Filling: Foundation of Flavor
- Creamy Natural Peanut Butter (1 cup): This is the heart of your pumpkin. Opt for a creamy, natural peanut butter (one with just peanuts and salt, or minimal added sugar) for the best texture and flavor. Stir it well before measuring, especially if it's oil-separated. Avoid overly processed, sugary brands, as they can alter the consistency and sweetness of your dough.
- Vanilla Protein Powder (or Peanut Butter Protein Powder) (½ cup): This is an interesting twist from the Navitas Organics recipe, adding structure and a nutritional boost. If you're not keen on protein powder or prefer a more traditional texture, you can substitute with powdered sugar for a sweeter, smoother dough, or even oat flour for a slightly healthier, denser option. Adjust quantity as needed to achieve a thick, workable dough.
- Pure Maple Syrup (¼ cup): A natural sweetener that also helps bind the dough. Maple syrup lends a subtle, earthy sweetness that complements the peanut butter beautifully. Alternatives include honey, agave nectar, or for a lower-sugar option, a sugar-free maple-flavored syrup or granulated erythritol (which might require a touch more liquid).
- Salt (½ tsp): Crucial for balancing the sweetness and enhancing the nutty flavor of the peanut butter. Don't skip it! Fine sea salt works wonderfully.
Expert Tip for Filling: The key is a thick, pliable dough. If your mixture seems too sticky, add a little more protein powder (or your chosen substitute) a tablespoon at a time until it reaches the desired consistency. If it's too dry, a tiny drizzle of maple syrup or extra peanut butter can help.
The Decadent Chocolate Shell: The Perfect Coating
- Navitas Organics Bittersweet Cacao Wafers (8 oz. bag) or Quality Dark Chocolate: The quality of your chocolate significantly impacts the final taste. Bittersweet cacao wafers offer a rich, deep chocolate flavor that beautifully contrasts the sweet peanut butter. You can also use good quality dark chocolate chips, a baking bar chopped into pieces, or even milk chocolate if you prefer a sweeter shell. Aim for at least 60% cacao for a truly indulgent experience.
- Coconut Oil (1 Tbsp): This is your secret weapon for a smooth, dippable chocolate coating that sets beautifully. Coconut oil helps to thin the melted chocolate, making it easier to work with, and ensures a crisp, firm shell once cooled.
Expert Tip for Chocolate: When melting your chocolate, low and slow is the way to go. Microwave in 30-second intervals, stirring vigorously after each, to prevent scorching. Alternatively, use a double boiler over simmering water for a more controlled melt. Ensure no water gets into your chocolate, as this will cause it to seize.
Step-by-Step to Spooktacular Shaping and Dipping
Creating your perfect chocolate peanut butter pumpkins is a rewarding process, and these detailed steps will ensure your treats turn out beautifully every time.
1. Prepare the Peanut Butter Dough
- In a medium-sized bowl, combine the creamy natural peanut butter, protein powder (or chosen substitute), pure maple syrup, and salt.
- Mix thoroughly using a sturdy spoon or your hands until a thick, uniform dough forms. It should be firm enough to roll without being overly sticky. If it’s too soft, add a bit more protein powder; if too crumbly, a tiny splash of maple syrup or a touch more peanut butter.
2. Shape Your Pumpkins
- Take a heaping tablespoon of the dough and roll it into a smooth ball between your palms.
- Gently flatten the ball slightly with your hands to create a disc.
- To achieve the iconic pumpkin shape, use your thumb or the back of a spoon to press inwards from one edge towards the center, creating an indented oval or kidney bean shape. Repeat this around the edges to form ridges, giving it that classic pumpkin look.
- For the "stem," pinch off a small half teaspoon of dough and roll it into a short, thin cylinder. Lightly press this onto the top center of your pumpkin-shaped dough.
- Repeat this process with the remaining dough, placing each shaped pumpkin onto a parchment-lined baking tray.
Pro Tip for Shaping: Work with cool hands, and if the dough becomes too warm and sticky, pop it back into the fridge for 5-10 minutes. For perfectly uniform pumpkins, use a cookie scoop for the initial ball of dough.
3. Chill and Firm Up
- Once all your pumpkins are shaped and on the parchment-lined tray, place them into the freezer for about 20 minutes. This step is crucial, as it firms up the peanut butter dough, making it easier to dip and preventing it from falling apart in the warm chocolate.
4. Melt the Chocolate Coating
- In a separate microwave-safe bowl, combine the cacao wafers (or chopped chocolate) and coconut oil.
- Heat in the microwave in 30-second intervals, stirring well after each interval, until the chocolate is completely melted and smooth. Be patient and avoid overheating, which can cause the chocolate to seize or burn.
5. Dip and Coat
- Remove the firm pumpkins from the freezer.
- Using a fork or a dipping tool, carefully submerge one pumpkin at a time into the melted chocolate. Ensure it's fully coated.
- Lift the pumpkin out, tapping the fork gently against the side of the bowl to let any excess chocolate drip off. This ensures a smooth, even coating.
- Place the coated pumpkin back onto the parchment-lined tray.
6. Final Chill and Enjoy!
- Once all pumpkins are coated, return the tray to the freezer for another 20 minutes, or until the chocolate has completely hardened.
- Once firm, your delightful chocolate peanut butter pumpkins are ready to be enjoyed!
Elevate Your Treat: Customization and Serving Ideas
While the classic chocolate peanut butter pumpkins are undeniably delicious, there's ample opportunity to personalize them and make them truly your own. Customization not only adds a unique flair but also allows you to cater to different tastes and dietary preferences.
Flavor Variations and Add-ins:
- Spiced Pumpkin: Incorporate a pinch of pumpkin pie spice or ground cinnamon into the peanut butter filling for an extra layer of autumnal flavor. A tiny dash of vanilla extract can also enhance the overall aroma.
- Crunch Factor: Mix finely chopped nuts (peanuts, pecans, or almonds) into the peanut butter dough for a delightful textural contrast. Mini chocolate chips can also be folded into the filling.
- Zesty Twist: A tiny bit of orange zest in the peanut butter dough can add a surprising and refreshing note that pairs beautifully with dark chocolate.
Dazzling Toppings and Decorations:
- Sea Salt Flakes: A sprinkle of flaky sea salt over the wet chocolate coating before it sets is a game-changer, enhancing the flavors and adding a gourmet touch.
- Festive Sprinkles: Halloween-themed sprinkles (ghosts, bats, orange and black jimmies) can be added to the wet chocolate for an extra pop of color and festivity.
- White Chocolate Drizzle: After the dark chocolate has set, melt a small amount of white chocolate and drizzle it decoratively over the pumpkins for an elegant finish. You can even tint the white chocolate with food coloring for vibrant orange or green accents.
- Edible Glitter or Dust: For a truly magical touch, brush edible gold or silver glitter onto the finished pumpkins.
Dietary Adaptations:
- Vegan-Friendly: Ensure your chocolate wafers or chips are certified vegan (dairy-free). All other ingredients in the base recipe are typically plant-based.
- Gluten-Free: The base recipe is naturally gluten-free, but always check labels for cross-contamination if severe allergies are a concern.
- Lower Sugar: As mentioned, use sugar-free maple syrup or granulated erythritol in the filling and ensure your chocolate is very dark (70%+) or sugar-free.
Serving and Storage Suggestions:
- Elegant Platter: Arrange your finished pumpkins artfully on a platter with some autumn leaves, miniature decorative gourds, or other Halloween decor for a stunning visual display.
- Party Favors: Wrap individual pumpkins in small cellophane bags tied with festive ribbons for unique and delicious party favors or trick-or-treat alternatives.
- Gift Giving: Package a small batch in a decorative box for a thoughtful homemade Halloween gift.
- Storage: Store your chocolate peanut butter pumpkins in an airtight container in the refrigerator for up to a week. For longer storage, they freeze beautifully for up to a month – just let them thaw for a few minutes before enjoying.
Whether you're celebrating a special occasion like a birthday during Halloween (as some do with their loved ones!) or just embracing the cozy vibes of the season, these adaptable treats promise to bring joy and deliciousness to your autumn days. So, get ready to channel your inner pumpkin patch and create some memorable moments in the kitchen!
These chocolate peanut butter pumpkins are more than just a sweet treat; they're a celebration of the season, a testament to the magic of simple ingredients, and a delightful way to bring smiles to faces. With their irresistible combination of creamy peanut butter and rich dark chocolate, paired with their charming festive shape, they are destined to become a cherished part of your Halloween traditions. So, gather your ingredients, enlist your friends or family for a fun kitchen activity, and prepare to indulge in these scarily good, homemade delights. Happy Halloween, and happy treating!
