Scarily Good: Dark Chocolate Peanut Butter Pumpkins Recipe – Your Ultimate Halloween Treat!
As the leaves begin to turn and a crisp autumn chill fills the air, minds inevitably drift to one thing: Halloween! Beyond the costumes and spooky decorations, a major part of the fun lies in the treats. And when it comes to iconic flavor pairings, nothing quite beats the timeless duo of chocolate and peanut butter. This year, ditch the store-bought candy and elevate your festive snacking with our sensational
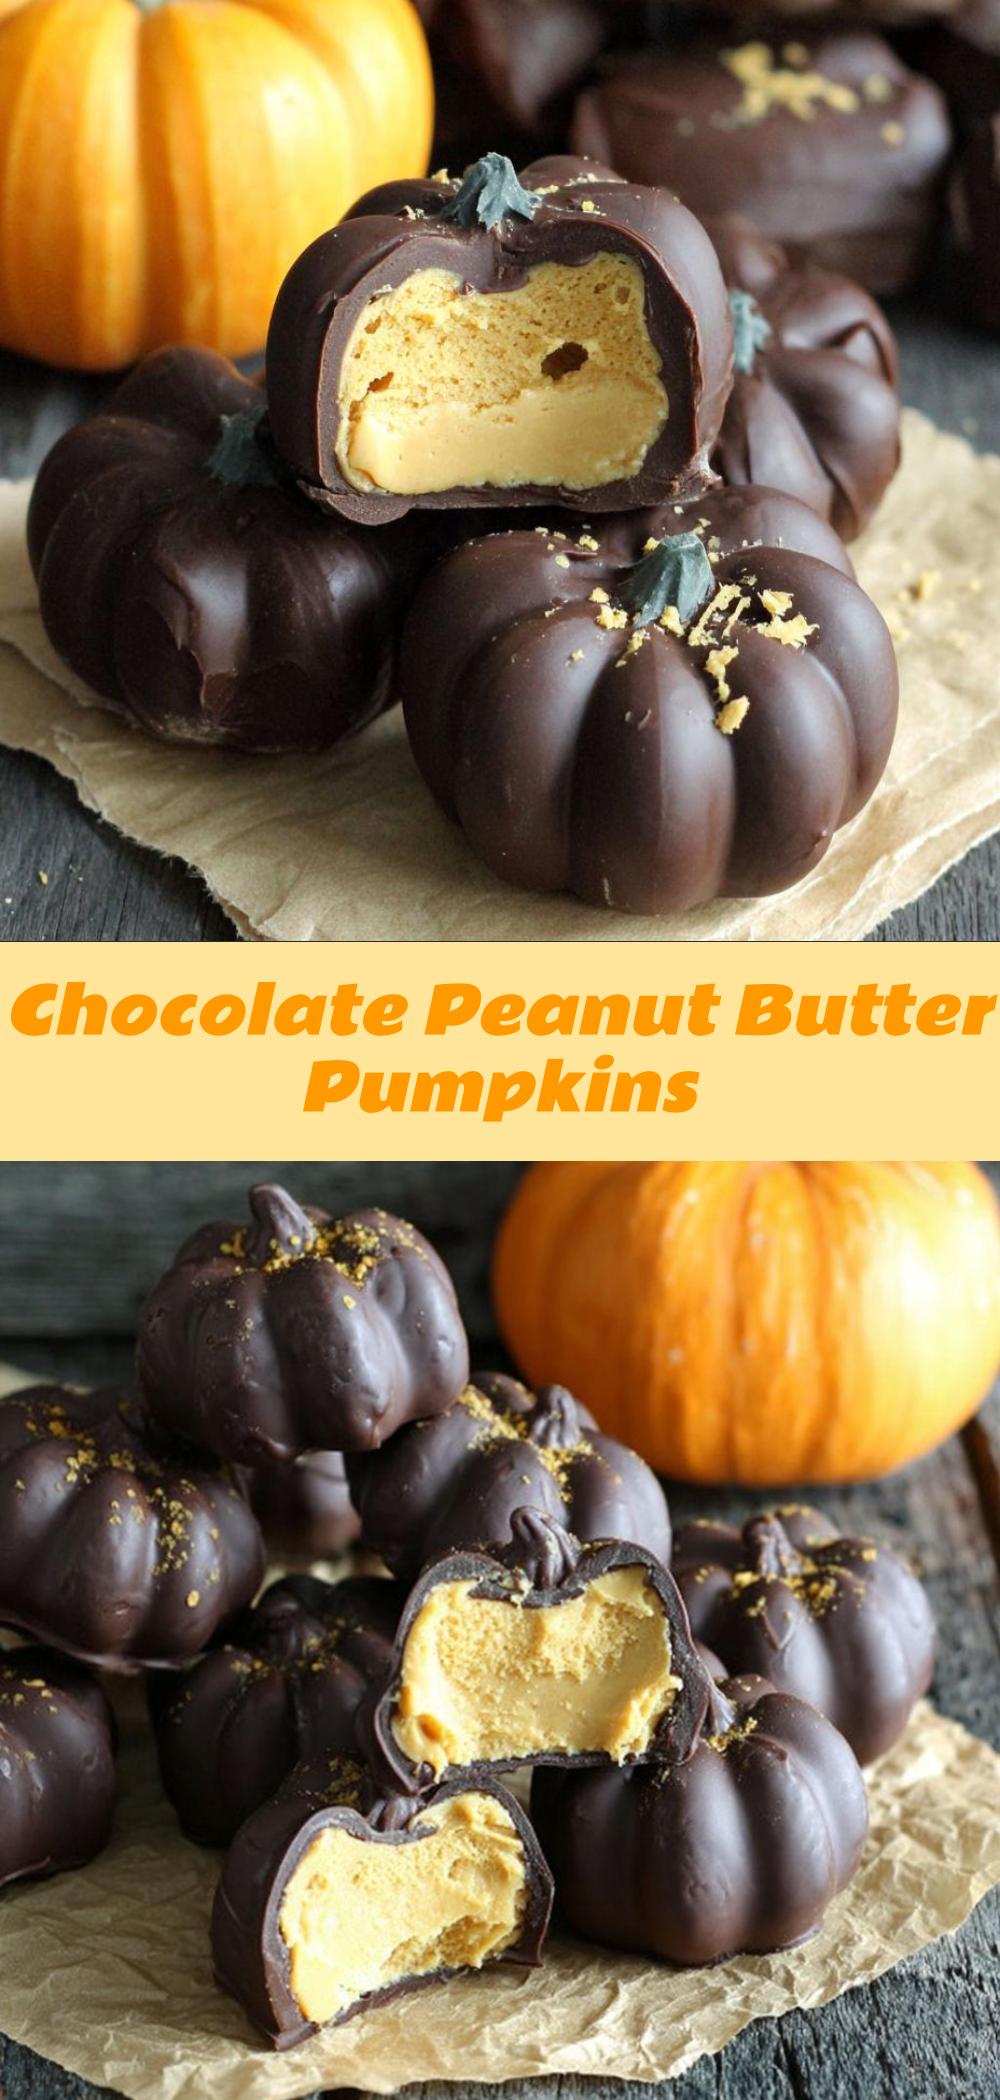
chocolate peanut butter pumpkins. These aren't just any treats; they're a "scarily good" twist on a classic, offering a rich, creamy peanut butter center enveloped in a sophisticated dark chocolate shell, all shaped into an adorable pumpkin for the ultimate seasonal delight.
Imagine the joy of biting into a homemade, no-bake confection that delivers all the nostalgic comfort of your favorite candy bar, but with a refined, artisanal touch. Perfect for spooky gatherings, a special treat for trick-or-treaters, or simply indulging in a not-so-scary snack at home, these pumpkins are incredibly easy to whip up. They offer a delightful blend of salty and sweet, with the subtle bitterness of dark chocolate perfectly complementing the creamy richness of peanut butter. Ready to channel your inner pumpkin patch? Let's get started on creating these charming, pumpkin-shaped delights that are sure to be a standout on any dessert table!
Why You'll Love These Scarily Good Chocolate Peanut Butter Pumpkins
There's a reason the combination of chocolate and peanut butter has stood the test of time, but these pumpkin-shaped treats take it to a whole new level of seasonal appeal. Here’s why this recipe will quickly become a Halloween favorite in your household:
*
Effortless No-Bake Creation: One of the biggest advantages of this recipe is that it requires absolutely no baking! This makes it a fantastic project for all skill levels, from beginner bakers to seasoned confectioners. It's also perfect for those busy days when you want a homemade treat without turning on the oven.
*
Health-Conscious Indulgence: While undeniably decadent, this recipe offers a customizable, healthier alternative to many store-bought Halloween candies. By using natural peanut butter, pure maple syrup, and dark cacao wafers, you have control over the quality of ingredients. The addition of protein powder not only helps firm up the peanut butter mixture but also adds a beneficial boost, making these treats more satisfying and less prone to sugar crashes.
*
Fun for All Ages: Shaping the peanut butter dough into pumpkins and then dipping them in chocolate is a delightful activity. It’s a wonderful way to involve kids in the kitchen, fostering creativity and providing a hands-on experience that results in an edible masterpiece. Friends will also love joining in on the festive fun!
*
Festive and Eye-Catching: The pumpkin shape instantly adds a whimsical, seasonal touch, making these treats a perfect centerpiece for any Halloween celebration. They’re far more impressive and personal than store-bought options and perfectly capture the spirit of the season.
*
The Perfect Flavor Symphony: The rich, slightly bitter notes of dark chocolate perfectly cut through the creamy, sweet, and salty essence of the peanut butter filling. It's a harmonious balance that will tantalize your taste buds with every bite. The choice of high-quality cacao wafers, such as Navitas Organics Bittersweet Cacao Wafers, truly elevates the chocolate experience.
Crafting Your Deliciously Spooky Treats: The Recipe
Creating these delightful
chocolate peanut butter pumpkins is a straightforward process that yields impressive results. Here’s everything you need to know to make them perfectly.
The Essential Ingredients for Success
The magic of these pumpkins lies in a few simple, high-quality ingredients. Each plays a crucial role in achieving the desired texture and flavor.
*
1 cup creamy natural peanut butter: Opt for natural peanut butter with minimal ingredients (just peanuts and salt is ideal). The creamy texture is essential for creating a smooth, pliable dough. Avoid "no-stir" varieties that often contain added oils and sugars, as they can alter the consistency of your dough.
*
½ cup vanilla protein powder (or peanut butter protein powder): This is a secret weapon! The protein powder not only adds a nutritious boost but also helps to firm up the peanut butter mixture, making it easier to shape and giving the pumpkins a satisfying density. Vanilla complements the flavors beautifully, but a peanut butter flavored protein powder would intensify the nutty taste. If you prefer to omit protein powder, you might need to adjust the amount of maple syrup and potentially add a tablespoon or two of powdered sugar to achieve the desired consistency.
*
¼ cup pure maple syrup: As a natural sweetener, maple syrup provides a delicate sweetness and helps bind the dough. Ensure you're using pure maple syrup, not pancake syrup, for the best flavor and quality. You could experiment with honey or agave nectar, but be aware that they might slightly alter the taste profile.
*
½ tsp. salt: A crucial ingredient that elevates the entire flavor profile! Salt balances the sweetness, enhances the peanut butter, and contrasts beautifully with the dark chocolate. For an extra gourmet touch, consider using a pinch of smoked sea salt in the peanut butter mixture, which adds a subtle depth.
*
8 oz. bag Navitas Organics Bittersweet Cacao Wafers: The star of the chocolate shell! Bittersweet cacao wafers offer a rich, intense chocolate flavor with a lower sugar content than milk chocolate. Navitas Organics wafers are known for their high quality, ensuring a smooth, luxurious coating. High-quality dark chocolate (60-75% cacao) is also a fantastic source of antioxidants.
*
1 Tbsp. coconut oil: This is vital for achieving a silky-smooth melted chocolate that coats the pumpkins perfectly. Coconut oil thins out the chocolate, making it easier to dip, and helps it set quickly and with a satisfying snap once chilled.
Step-by-Step Guide to Pumpkin Perfection
Follow these easy steps to bring your
chocolate peanut butter pumpkins to life:
1.
Prepare the Peanut Butter Dough: In a medium-sized mixing bowl, combine the creamy natural peanut butter, protein powder, pure maple syrup, and salt. Mix thoroughly with a sturdy spoon or rubber spatula until a thick, uniform dough forms. It should be firm enough to handle without being overly sticky. *Pro Tip: If your dough seems too crumbly, add a tiny bit more maple syrup (½ tsp at a time). If it's too sticky, incorporate a little more protein powder (½ tsp at a time) until it reaches the right consistency.*
2.
Shape the Pumpkins: Take a heaping tablespoon of the peanut butter dough. Roll it into a smooth ball between your palms. Gently press it flat, then use your fingers to push inwards from one edge towards the center to create a subtle indented oval shape, mimicking the natural ridges of a pumpkin.
3.
Add the Stems: For each pumpkin, pinch off a small half teaspoon of dough and shape it into a tiny stem. Lightly press this stem onto the top of your pumpkin-shaped dough. This simple detail truly brings the pumpkin look to life.
4.
Chill for Firmness: Repeat the shaping process with the remaining dough. Arrange all the shaped pumpkins on a parchment-lined baking tray. Place the tray in the freezer for approximately 20 minutes. This crucial step firms up the peanut butter mixture, making it much easier to coat with chocolate without losing its shape.
5.
Melt the Chocolate Coating: While the pumpkins are chilling, prepare your chocolate. In a separate microwave-safe bowl, combine the cacao wafers and coconut oil. Heat in the microwave in 30-second intervals, stirring vigorously after each interval, until the chocolate is completely melted and smooth. Be careful not to overheat the chocolate, as it can seize. Alternatively, you can melt the chocolate using a double boiler method for more controlled heating.
6.
Coat and Set: Once the chocolate is smooth and the peanut butter pumpkins are firm, it's time to dip! Using a fork or a candy dipping tool, carefully submerge each pumpkin into the melted chocolate, ensuring it's fully coated. Gently tap off any excess chocolate against the side of the bowl.
7.
Final Chill and Enjoy: Place the chocolate-coated pumpkins back onto the parchment-lined tray. Return the tray to the freezer for another 20 minutes, or until the chocolate shell has completely hardened and set. Once firm, they are ready to be enjoyed!
This recipe typically yields 10-12 delightful chocolate peanut butter pumpkins, perfect for sharing or savoring yourself.
Beyond the Basics: Tips, Variations, and Serving Suggestions
While the basic recipe for these
chocolate peanut butter pumpkins is fantastic as is, there's always room for creativity and enhancement.
Tips for Success:
*
Parchment is Your Friend: Always use parchment paper or silicone baking mats on your trays to prevent sticking and make cleanup a breeze.
*
Work Quickly: The peanut butter dough is easiest to work with when it's cool. If your kitchen is warm, you might want to chill the dough for a few minutes before shaping or work in batches.
*
Consistent Sizing: For uniform pumpkins, use a small cookie scoop (about 1 tablespoon capacity) to portion out the peanut butter dough before rolling.
*
Storage: Store your finished chocolate peanut butter pumpkins in an airtight container in the refrigerator for up to a week, or in the freezer for up to a month. They're delicious straight from the fridge or freezer!
Creative Variations:
*
Nut Butter Alternatives: Feel free to experiment with other creamy nut butters like almond butter or cashew butter for a different flavor profile. Just be mindful that their consistencies might vary slightly.
*
Spice It Up: Add a pinch of cinnamon, nutmeg, or even a dash of pumpkin pie spice to the peanut butter mixture for an extra autumnal touch.
*
Crunch Factor: Fold in some finely chopped roasted peanuts, mini chocolate chips, or even a tablespoon of crispy rice cereal into the peanut butter dough for added texture.
*
Decorative Flair: After the dark chocolate has set, you can drizzle melted white chocolate (perhaps tinted with orange food coloring) over the pumpkins for a mummy or web effect. Sprinkles, edible glitter, or even a tiny green sugar leaf on the stem can also add extra charm.
*
Different Chocolate: While dark chocolate is recommended for its balance, you can certainly use milk chocolate for a sweeter treat or even white chocolate for a completely different aesthetic.
Serving Suggestions:
These versatile treats are perfect for a multitude of occasions:
*
Halloween Party Platter: Arrange them artfully on a serving platter alongside other festive goodies for a show-stopping display.
*
Lunchbox Surprise: Tuck one into a child's lunchbox for a delightful midday treat.
*
Thoughtful Gifts: Package them in small cellophane bags tied with festive ribbons as homemade gifts for friends, teachers, or neighbors.
*
After-Dinner Indulgence: Enjoy one with a cup of coffee or a "spooky" cocktail for a sophisticated seasonal dessert.
The Magic of No-Bake: Why These Treats Are a Seasonal Star
The appeal of no-bake recipes, especially during busy holiday seasons like Halloween, cannot be overstated. These
Easy No-Bake Chocolate Peanut Butter Pumpkins for Halloween exemplify convenience without sacrificing flavor or festive spirit. They bypass the need for precise oven temperatures, lengthy cooling times, and complex baking techniques, making them accessible to home cooks of all experience levels. This simplicity allows you to focus on the fun aspects – shaping, dipping, and decorating – turning the cooking process into a joyful, stress-free activity.
Furthermore, the no-bake nature means these treats are incredibly quick to prepare, freeing up more time for other Halloween preparations, like pumpkin carving or watching classic spooky movies. It’s an ideal solution when you want to
Indulge in Festive Chocolate Peanut Butter Pumpkins this Halloween without committing hours to the kitchen. The magic truly lies in their ability to deliver a deeply satisfying, celebratory treat with minimal effort, proving that sometimes, the simplest methods yield the most enchanting results.
Conclusion
These
scarily good dark chocolate peanut butter pumpkins are more than just a recipe; they're an invitation to embrace the festive spirit of Halloween with creativity, flavor, and a touch of homemade charm. Combining the irresistible classic duo of chocolate and peanut butter with a fun, seasonal shape, they offer a no-bake solution that is both incredibly easy and deeply satisfying. Whether you're making them for a party, as a special treat, or simply to enjoy the nostalgic flavors of the season, these pumpkins are guaranteed to be a hit. So, gather your ingredients, unleash your inner confectioner, and prepare to delight everyone with these enchanting, "scarily good" treats that perfectly capture the magic of autumn. Happy Halloween, and happy snacking!